Animation
애니메이션을 구현하는 방법은 두가지가 있다
본애니메이션 : 움직이는 물체에 뼈대를 심고 움직이는 방법

- 관련 프로그램 : Spine2D
스프라이트 : 움직이는 모습을 프레임 단위로 그려내는 방법 (플립북)

-관련 프로그램 : Aseprite(픽셀아트 툴)
Animation Mecanim
유니티 메카님 시스템을 이용한 플레이어 이동 애니메이션 구현해보기
리소스 배치
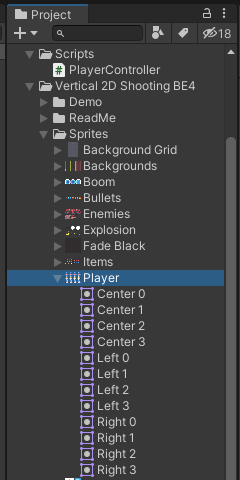
게임오브젝트로 사용할 이미지 프로젝트 창으로 드래그 & 드롭
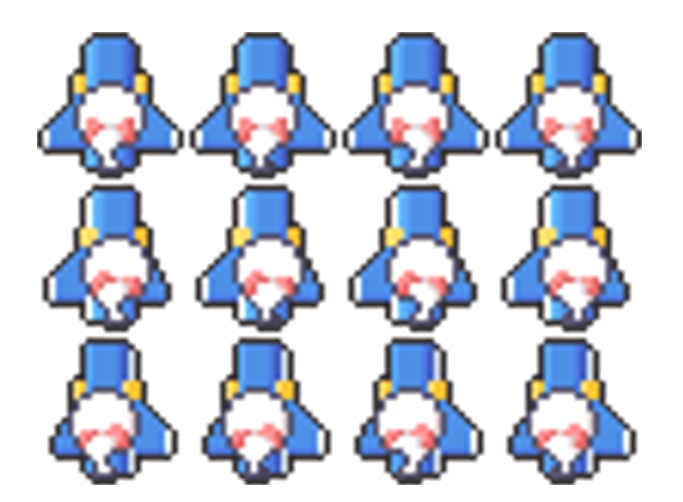
기본 애니메이션 (Center 0, 1, 2, 3)
왼쪽 이동 애니메이션 (Left 0, 1, 2, 3)
오른쪽 이동 애니메이션 (Right 0, 1, 2, 3)

리소스 배치
애니메이션을 넣을 게임오브젝트 선택

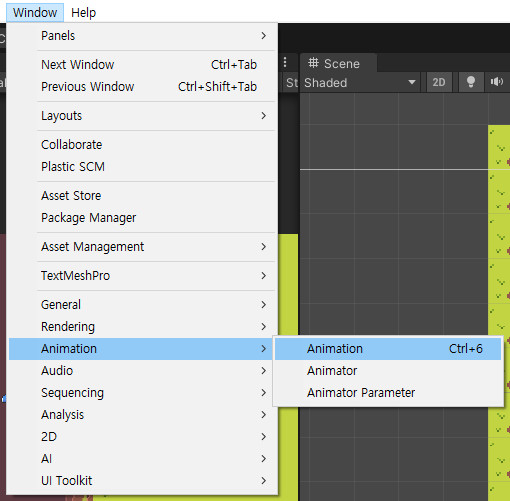
Window -> Animation -> Animation
Create New Clip


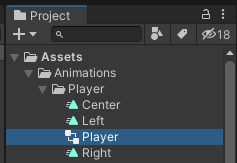
Assets/Animations/Player 로 폴더를 관리
Center : 기본 애니메이션 (Center 0, 1, 2, 3)
Left : 왼쪽 이동 애니메이션 (Left 0, 1, 2, 3)
Right : 오른쪽 이동 애니메이션 (Right 0, 1, 2, 3)
스프라이트 이미지 순서대로 배치

클립이 저장됨, Play 더블클릭
Animator창이 열린다

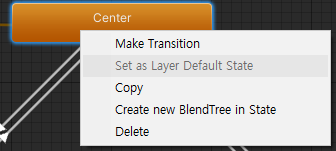
Set as Layer Default State : 센터를 기본 상태로 세팅
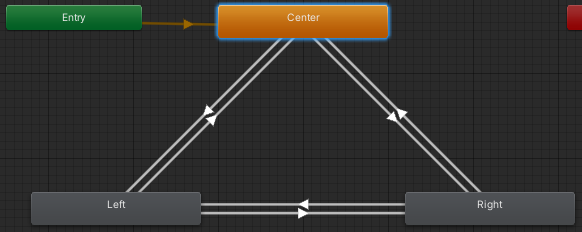
Make Transition으로 각 상태를 연결
키보드가 눌렸는가를 true와 false로 받아 해당 애니메이션을 출력해보자
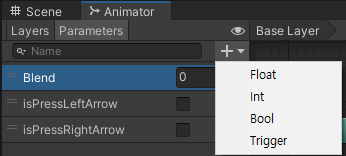
Pramaters -> + -> Bool
부울식판독

Transition 라인을 클릭하고
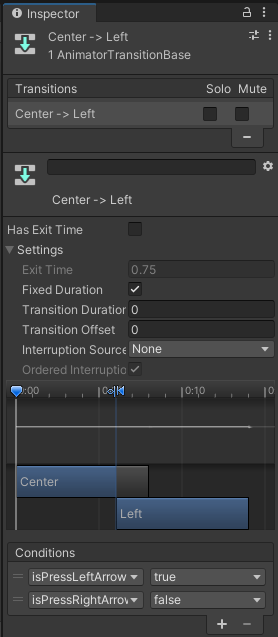
인스펙터 창에서 Conditions -> + 를 하면 Bool식 컨디션을 불러 올 수 있다.
Pramaters의 상태에 따라 실행하는가를 결정한다.
Has Exit Time를 설정하면 Blend가 설정된 씬 전환이 가능하지만
여기선 불필요하니 체크 해제해준다.
애니메이션 코드
using System.Collections;
using System.Collections.Generic;
using UnityEngine;

public class PlayerController : MonoBehaviour
{
    Animator animator;

    void Start()
    {
        this.animator = GetComponent<Animator>();
    }

    void Update()
    {
        bool isPressRightArrow = false;
        bool isPressLeftArrow = false;

        //좌 애니메이션
        if (Input.GetKey(KeyCode.LeftArrow))
        {
            isPressLeftArrow = true;
        }
        //우 애니메이션
        if (Input.GetKey(KeyCode.RightArrow))
        {
            isPressRightArrow = true;
        }

        //좌 애니메이션
        this.animator.SetBool("isPressLeftArrow", isPressLeftArrow);
        //우 애니메이션
        this.animator.SetBool("isPressRightArrow", isPressRightArrow);
    }
}
플레이어 이동
PlayerController 스크립트 생성
Player에 부착
PlayerController 스크립트 수정
Input.GetKey를 이용한 방법
using System.Collections;
using System.Collections.Generic;
using UnityEngine;

public class PlayerController : MonoBehaviour
{
    Animator animator;
    private bool isPressLeftArrow;
    private bool isPressRightArrow;

    void Start()
    {
        this.animator = GetComponent<Animator>();
    }

    void Update()
    {
        this.isPressRightArrow = false;
        this.isPressLeftArrow = false;
        //이동한다
        //좌 애니메이션
        if (Input.GetKey(KeyCode.LeftArrow))
        {
            this.isPressLeftArrow = true;
        }
        //우 애니메이션
        if (Input.GetKey(KeyCode.RightArrow))
        {
            this.isPressRightArrow = true;
        }
        //좌 애니메이션
        this.animator.SetBool("isPressLeftArrow", isPressLeftArrow);
        //우 애니메이션
        this.animator.SetBool("isPressRightArrow", isPressRightArrow);

        //좌 이동
        if (Input.GetKey(KeyCode.LeftArrow))
        {
            //방향 * 속도 * 시간
            this.transform.Translate(Vector2.left * 5.0f * Time.deltaTime);
        }
        //우 이동
        if (Input.GetKey(KeyCode.RightArrow))
        {
            this.transform.Translate(Vector2.right * 5.0f * Time.deltaTime);
        }
        //상 이동
        if (Input.GetKey(KeyCode.UpArrow))
        {
            this.transform.Translate(Vector2.up * 5.0f * Time.deltaTime);
        }
        //하 이동
        if (Input.GetKey(KeyCode.DownArrow))
        {
            this.transform.Translate(Vector2.down * 5.0f * Time.deltaTime);
        }
    }
}
Input.GetAxisRaw를 이용한 방법
using System.Collections;
using System.Collections.Generic;
using UnityEngine;

public class PlayerController : MonoBehaviour
{
    Animator animator;
    public float speed = 2.0f;

    void Start()
    {
        this.animator = GetComponent<Animator>();
    }

    void Update()
    {
        bool isPressRightArrow = false;
        bool isPressLeftArrow = false;

        //좌 애니메이션
        if (Input.GetKey(KeyCode.LeftArrow))
        {
            isPressLeftArrow = true;
        }
        //우 애니메이션
        if (Input.GetKey(KeyCode.RightArrow))
        {
            isPressRightArrow = true;
        }

        //좌 애니메이션
        this.animator.SetBool("isPressLeftArrow", isPressLeftArrow);
        //우 애니메이션
        this.animator.SetBool("isPressRightArrow", isPressRightArrow);

        float v = Input.GetAxisRaw("Vertical");        //키보드 입력을 -1, 0, 1 까지 수로 반환 (정수)
        float h = Input.GetAxisRaw("Horizontal");

        Vector2 dir = new Vector2(h, v);
        this.transform.Translate(dir * this.speed * Time.deltaTime);
    }
}
| Input.GetAxis -1 ~ 1 범위 반환 특정 Input Manager로 설정한 정보를, axisName 인수로 가져옵니다. 키보드와 조이스틱 입력값에 대해 -1에서 1까지의 값을 가집니다. 축이 마우스의 이동량으로 설정되는 경우, 마우스의 이동량은 축 감도를 곱하므로, -1 ... 1 범위에서는 없습니다. 이것은 독립적인 프레임 속도로 작동합니다. 따라서 이 함수를 사용한 값을 사용하면 프레임 속도가 변경되었을 때를 생각할 필요는 없습니다. https://docs.unity3d.com/kr/530/ScriptReference/Input.GetAxis.html Input.GetAxisRaw -1, 0, 1 반환 /axisName/에 의해 식별된 가상축의 값을 반환합니다. 키보드와 조이스틱 입력값에 대해 -1에서 1까지의 값을 가집니다. 입력이 다듬어지지 않았기에, 키보드 입력은 항상 -1, 0 이나 1중 하나 일 것입니다. This is useful if you want to do all smoothing of keyboard input processing yourself. https://docs.unity3d.com/kr/530/ScriptReference/Input.GetAxisRaw.html |
대각선 이동이나 동시 입력을 고려하여 수정하자
이동 한계선 설정하기
void Update()
    {
        float v = Input.GetAxisRaw("Vertical");        //키보드 입력을 -1, 0, 1 까지 수로 반환 (정수)
        float h = Input.GetAxisRaw("Horizontal");

        //이동제한
        // && h == -1 을 붙이지 않으면 해당 좌표에서 계속 멈추는 현상 발생
        if (this.transform.position.x < -8.6f && h == -1)
        {
            h = 0;
        }
        if (this.transform.position.x > 8.6 && h == 1)
        {
            h = 0;
        }
        if (this.transform.position.y < -4.7f && v == -1)
        {
            v = 0;
        }
        if (this.transform.position.y > 4.8 && v == 1)
        {
            v = 0;
        }
        Vector2 dir = new Vector2(h, v);
        this.transform.Translate(dir * this.speed * Time.deltaTime);
    }
if (this.transform.position.x < -8.6f && h == -1)
위치한 곳이 경계선 && 경계선 밖으로 이동하려 한다면
이동방향 0으로 만든다.
'Unity > 게임 엔진 응용 프로그래밍' 카테고리의 다른 글
| Vertical 2D Shooting 04 : 레이어된 배경 스크롤링 (0) | 2021.10.13 |
|---|---|
| Vertical 2D Shooting 03 : 플레이어 공격 (0) | 2021.10.13 |
| Vertical 2D Shooting 01 : 게임기획 (0) | 2021.10.13 |
| Unity : SwipeCar / UI(캔버스 좌표계) (0) | 2021.10.13 |
| Unity : 룰렛 프로젝트 (0) | 2021.10.10 |