프로젝트 생성
프로젝트 명 : SwipeCar
템플릿 : 2D
빌드 셋팅
프로젝트 생성하면 먼저 빌드 셋팅을 타겟 플렛폼으로 변경을 해준다.

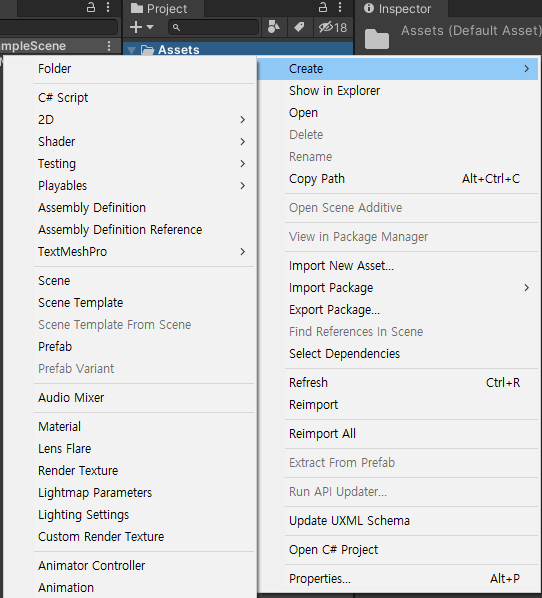
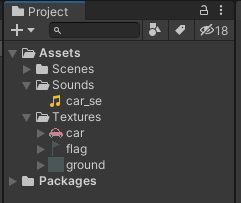
리소스 관리폴더 생성


리소스 추가
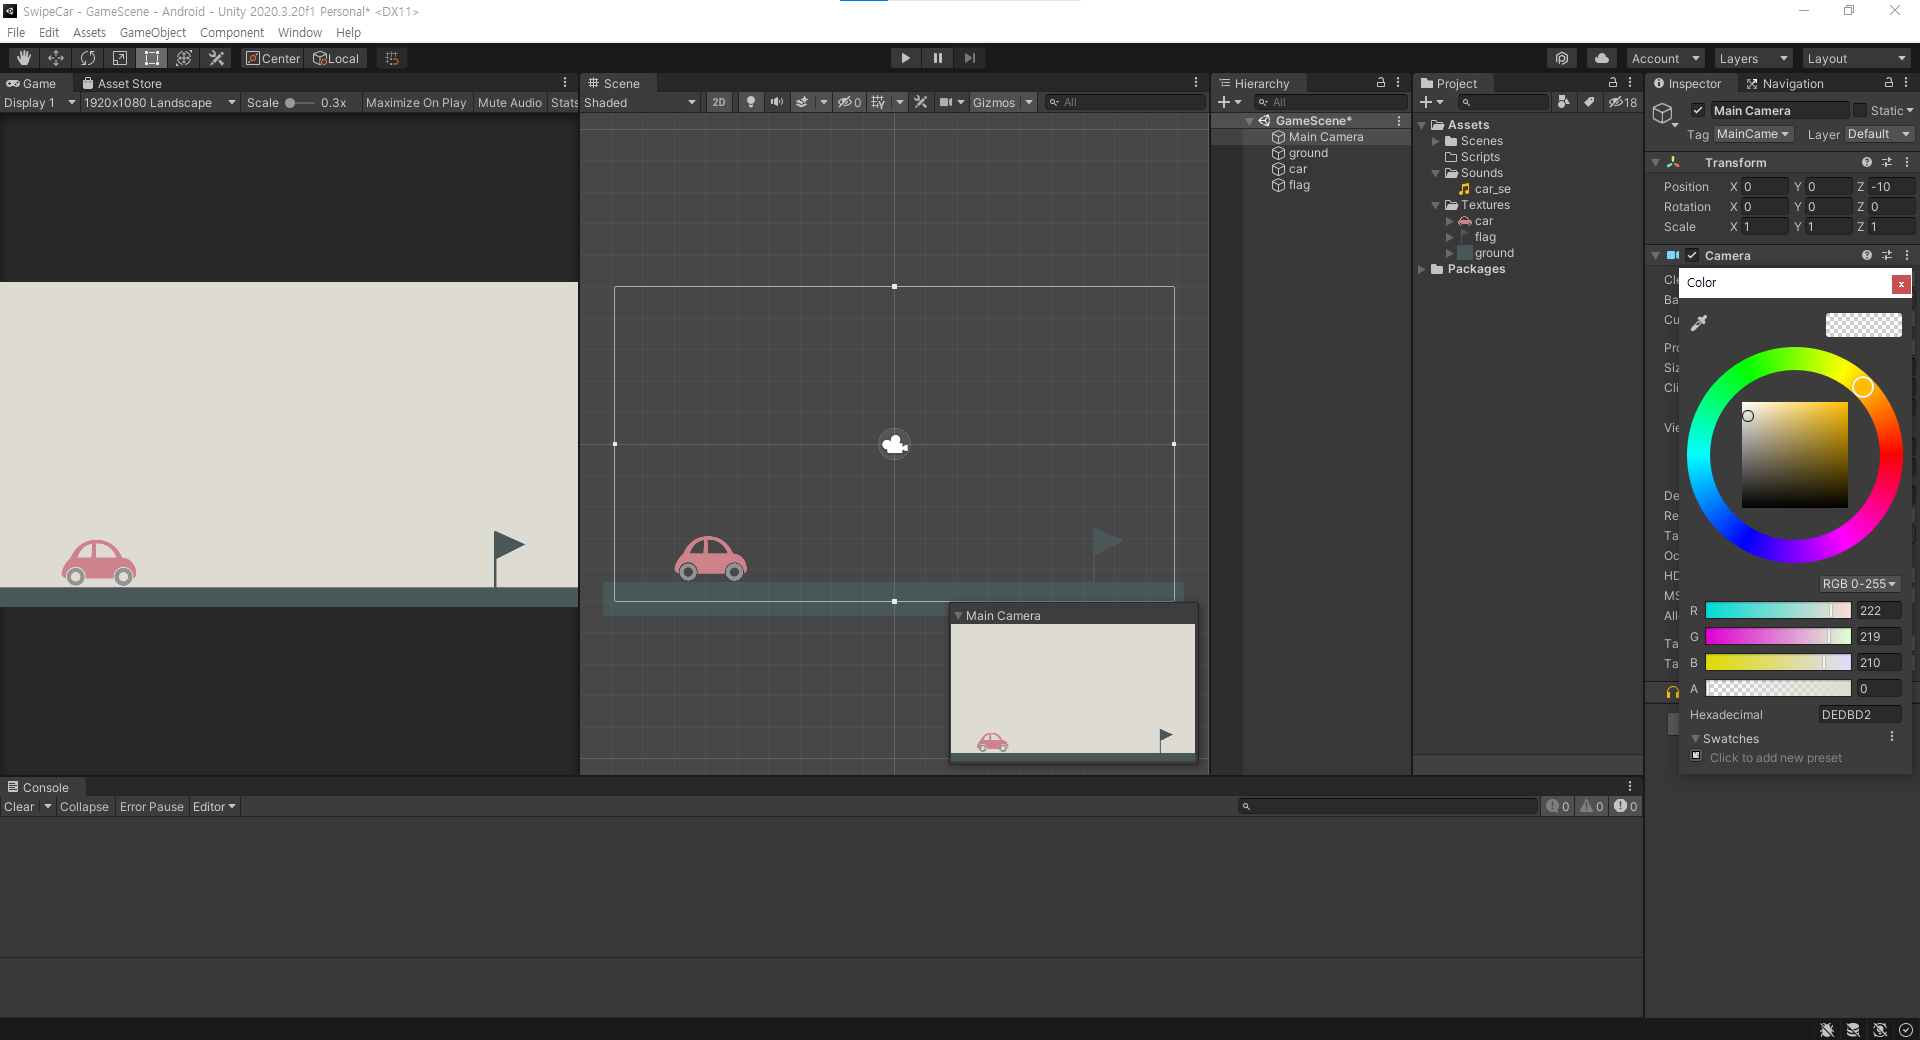
리소스 배치, 배경설정
스크립트 관리폴더 생성, 스크립트 생성, 오브젝트에 에드 컴포넌트

스크립트 작성
using System.Collections;
using System.Collections.Generic;
using UnityEngine;

public class CarController : MonoBehaviour
{
    public float speed = 0;

    void Start()
    {

    }

    void Update()
    {
        //왼쪽버튼을 눌렀다면
        if (Input.GetMouseButtonDown(0))
        {
            this.speed = 0.2f;  //스피드를 초기화
        }

        this.transform.Translate(this.speed, 0, 0); //이동
        this.speed *= 0.98f;    //감속

    }
}
transform.Translate(x, y, z)
https://docs.unity3d.com/ScriptReference/Transform.Translate.html
Unity - Scripting API: Transform.Translate
Declaration public void Translate(float x, float y, float z); Declaration public void Translate(float x, float y, float z, Space relativeTo = Space.Self);
docs.unity3d.com
Declaration
public void Translate(Vector3 translation);
Declaration
public void Translate(Vector3 translation, Space relativeTo = Space.Self);
스크립트에서 public으로 선언된 필드, 맴버는 인스펙터 창에서 접근 수정이 가능하다.


스와이프로 이동
Input.mousePosition
해당 해상도의 픽셀좌표
using System.Collections;
using System.Collections.Generic;
using UnityEngine;

public class CarController : MonoBehaviour
{
    public float speed;
    Vector2 startPos;

    void Start()
    {

    }

    void Update()
    {
        //스와이프 길이를 구하는법
        if (Input.GetMouseButtonDown(0))    //마우스를 클릭하면
        {
            //마우스를 클릭한 좌표
            this.startPos = Input.mousePosition;
        }
        else if (Input.GetMouseButtonUp(0)) //마우스를 떼었다면
        {
            //떼었을 때 좌표
            Vector2 endPos = Input.mousePosition;
            float swipeLength = endPos.x - this.startPos.x;

            //스와이프 길이를 속도로 변경
            this.speed = swipeLength / 500.0f;
        }

        this.transform.Translate(this.speed, 0, 0); //이동
        this.speed *= 0.98f;    //감속
    }
}
UI를 만드는 방법
1. UI 부품을 Scene 뷰에 배치한다
2. UI를 갱신하는 감독 스크립트를 작성한다.
3. 빈 오브젝트를 만들고 작성한 스크립트를 적용한다.
UI 표시하기
UI.Text를 사용해 거리 표시하기
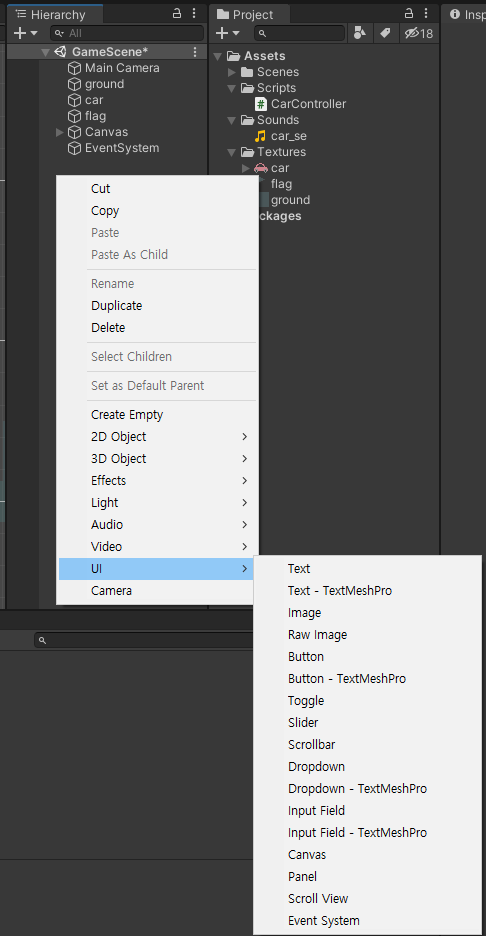
하이어라키 + -> UI -> Text
하이어라키 우클릭 -> UI -> Text
UI는 캔버스 좌표계를 사용한다.
***** EventSystem이 같이 생성된다. 지우면 안된다.
UI의 인풋을 받는 역할을 한다.
입력 할당이나 무효화 등 키와 마우스 설정을 변경할 수 있다.

Height = 폰트사이즈 + 10 하면 화면에 출력이 잘된다.
폰트에 폰트파일을 끌어다 놓을수 있다.
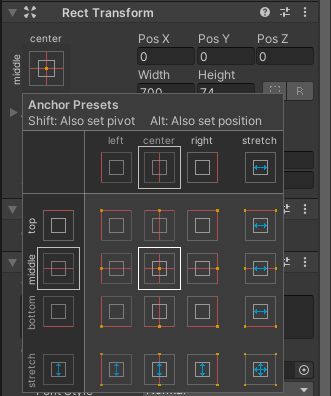
UI의 위치 조절 쉬프트 피벗, 알트 포지션
using System.Collections;
using System.Collections.Generic;
using UnityEngine;
using UnityEngine.UI;

public class GameDirector : MonoBehaviour
{
    GameObject car;
    GameObject flag;
    GameObject distance;

    // Start is called before the first frame update
    void Start()
    {
        this.car = GameObject.Find("car");
        this.flag = GameObject.Find("flag");
        this.distance = GameObject.Find("Distance");

        Debug.LogFormat("{0} {1} {2}", this.car, this.flag, this.distance);
    }

    // Update is called once per frame
    void Update()
    {

    }
}
https://docs.unity3d.com/ScriptReference/GameObject.Find.html
Unity - Scripting API: GameObject.Find
This function only returns active GameObjects. If no GameObject with name can be found, null is returned. If name contains a '/' character, it traverses the hierarchy like a path name. For performance reasons, it is recommended to not use this function eve
docs.unity3d.com
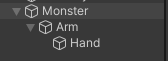
Find 예제
using System.Collections;
using System.Collections.Generic;
using UnityEngine;

public class Find : MonoBehaviour
{
    public GameObject hand;
    private void Start()
    {
        // This returns the GameObject named Hand.
        this.hand = GameObject.Find("Hand");   //찾음

        Debug.LogFormat("hand : {0}", this.hand);

        // This returns the GameObject named Hand.
        // Hand must not have a parent in the Hierarchy view.
        hand = GameObject.Find("/Hand");   //못찾음

        Debug.LogFormat("hand : {0}", this.hand);

        // This returns the GameObject named Hand,
        // which is a child of Arm > Monster.
        // Monster must not have a parent in the Hierarchy view.
        hand = GameObject.Find("/Monster/Arm/Hand");   //찾음

        Debug.LogFormat("hand : {0}", this.hand);

        // This returns the GameObject named Hand,
        // which is a child of Arm > Monster.
        hand = GameObject.Find("Monster/Arm/Hand");   //찾음

        Debug.LogFormat("hand : {0}", this.hand);


        //hand = GameObject.Find("/Monster/Arm"); 같다
        hand = GameObject.Find("Monster/Arm");   //찾음

        Debug.LogFormat("hand : {0}", this.hand);

        hand = GameObject.Find("/Arm");   //못찾음

        Debug.LogFormat("hand : {0}", this.hand);

        hand = GameObject.Find("Arm");   //찾음

        Debug.LogFormat("hand : {0}", this.hand);
    }
}
UI에 거리 출력하기
using System.Collections;
using System.Collections.Generic;
using UnityEngine;
using UnityEngine.UI;

public class GameDirector : MonoBehaviour
{
    GameObject car;
    GameObject flag;
    GameObject distance;

    // Start is called before the first frame update
    void Start()
    {
        this.car = GameObject.Find("car");
        this.flag = GameObject.Find("flag");
        this.distance = GameObject.Find("Distance");

        Debug.LogFormat("{0} {1} {2}", this.car, this.flag, this.distance);
    }

    // Update is called once per frame
    void Update()
    {
        //자동차와 깃발 사이 거리
        float distance = this.flag.transform.position.x - this.car.transform.position.x;
        Text text = this.distance.GetComponent<Text>();
        text.text = string.Format("목표 지점까지 {0}m", distance.ToString("F2"));
        //text.text = string.Format("목표 지점까지 {0:0.00}m", distance);

    }
}
게임오버 출력
using System.Collections;
using System.Collections.Generic;
using UnityEngine;
using UnityEngine.UI;

public class GameDirector : MonoBehaviour
{
    GameObject car;
    GameObject flag;
    GameObject distance;

    // Start is called before the first frame update
    void Start()
    {
        this.car = GameObject.Find("car");
        this.flag = GameObject.Find("flag");
        this.distance = GameObject.Find("Distance");

        Debug.LogFormat("{0} {1} {2}", this.car, this.flag, this.distance);
    }

    // Update is called once per frame
    void Update()
    {
        //자동차와 깃발 사이 거리
        float distance = this.flag.transform.position.x - this.car.transform.position.x;

        if(distance >= 0)
        {
            Text text = this.distance.GetComponent<Text>();
            text.text = string.Format("목표 지점까지 {0}m", distance.ToString("F2"));
            //text.text = string.Format("목표 지점까지 {0:0.00}m", distance);
        }
        else
        {
            Text text = this.distance.GetComponent<Text>();
            text.text = string.Format("게임 오버!");
        }

    }
}
c# ToString() 을 이용한 자리수 설정
https://art-life.tistory.com/134
오디오 넣기 AudioSource 컴포넌트를 사용하는 방법
효과음을 내는 방법
1. 효과음을 낼 오브젝트에 AudioSource 컴포넌트를 적용한다.
2. AudioSource 컴포넌트에 효과음을 설정한다.
3. 효과음을 울리고 싶은 시간에 스와이프하면 Play 메서드를 호출한다.
1. 효과음을 낼 오브젝트에 AudioSource 컴포넌트를 적용한다.
car오브젝트 클릭
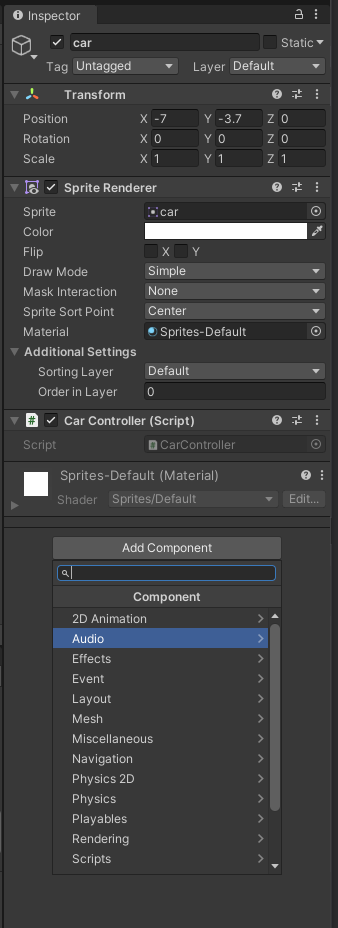
Add Component -> Audio Source

Play On Awake 체크 해제 (체크하면 게임 시작시 재생된다, 유니티 라이프사이클 참고)

2. AudioSource 컴포넌트에 효과음을 설정한다.
프로젝트 창의 오디오소스 car_se를
AudioSource 컴포넌트의 AudioClip으로 드래그&드롭

3. 효과음을 울리고 싶은 시간에 스와이프하면 Play 메서드를 호출한다.
효과음이 적용된 게임오브젝트와 연결된 스크립트에서 Play메서드를 호출해야 한다.
AudioSource.Play
클립을 재생합니다.
https://docs.unity3d.com/ScriptReference/AudioSource.Play.html
using System.Collections;
using System.Collections.Generic;
using UnityEngine;

public class CarController : MonoBehaviour
{
    public float speed;
    Vector2 startPos;

    void Start()
    {

    }

    void Update()
    {
        //스와이프 길이를 구하는법
        if (Input.GetMouseButtonDown(0))    //마우스를 클릭하면
        {
            //마우스를 클릭한 좌표
            this.startPos = Input.mousePosition;
        }
        else if (Input.GetMouseButtonUp(0)) //마우스를 떼었다면
        {
            //떼었을 때 좌표
            Vector2 endPos = Input.mousePosition;
            float swipeLength = endPos.x - this.startPos.x;

            //스와이프 길이를 속도로 변경
            this.speed = swipeLength / 1500.0f;

            //효과음을 재생한다.
            GetComponent<AudioSource>().Play();
        }

        this.transform.Translate(this.speed, 0, 0); //이동
        this.speed *= 0.98f;    //감속
    }
}
빌드하기
'Unity > 게임 엔진 응용 프로그래밍' 카테고리의 다른 글
| Vertical 2D Shooting 02 : 플레이어 이동 (0) | 2021.10.13 |
|---|---|
| Vertical 2D Shooting 01 : 게임기획 (0) | 2021.10.13 |
| Unity : 룰렛 프로젝트 (0) | 2021.10.10 |
| 화살피하기 (0) | 2021.10.06 |
| 룰렛 프로젝트 : 룰렛 회전, 멈춤 (0) | 2021.10.04 |